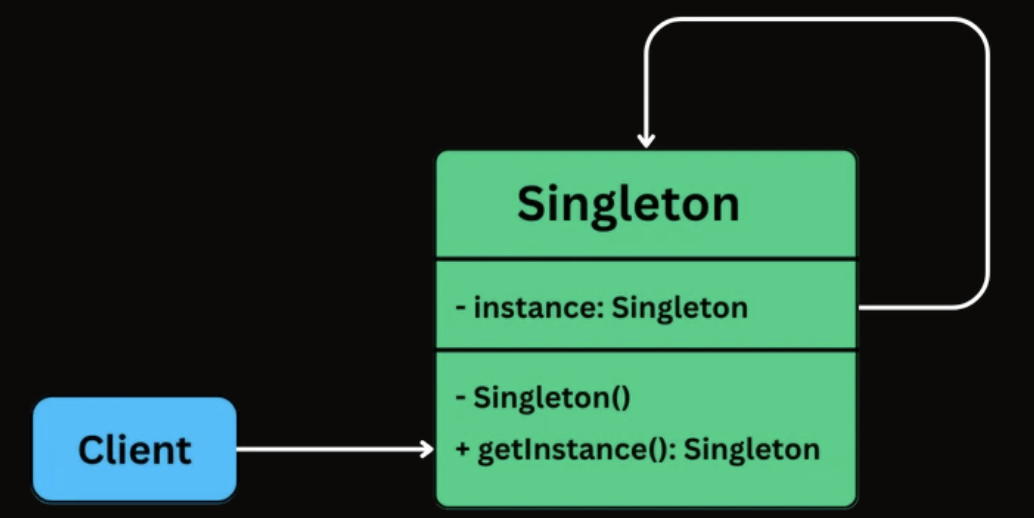
To implement the singleton pattern, we must prevent external objects from creating instances of the singleton class. Only the singleton class should be permitted to create its own objects.
Additionally, we need to provide a method for external objects to access the singleton object.
An instance field stores the one and only Singleton object.
The constructor is private or otherwise restricted, so other code cannot create new instances directly.
A getInstance() (or similar) class-level method returns the shared instance and is accessible from anywhere.
class Singleton {
    // Holds the single shared instance (initially not created)
    private static Singleton instance;

    // Private constructor prevents creating objects from outside the class
    private Singleton() {}

    // Global access point to get the Singleton instance
    public static Singleton getInstance() {

        // Create the instance only when first requested (initialization)
        if (instance == null) {
            instance = new Singleton();
        }

        // Return the shared instance
        return instance;
    }
}
class Singleton:
    # Holds the single shared instance (initially not created)
    _instance = None

    # Constructor prevents direct creation if instance already exists
    def __init__(self):
        if Singleton._instance is not None:
            raise Exception("Use get_instance() instead.")

    # Global access point to get the Singleton instance
    @staticmethod
    def get_instance():

        # Create the instance only when first requested (lazy initialization)
        if Singleton._instance is None:
            Singleton._instance = Singleton()

        # Return the shared instance
        return Singleton._instance
class Singleton {
private:
    // Holds the single shared instance (initially not created)
    static Singleton* instance;

    // Private constructor prevents creating objects from outside the class
    Singleton() {}

public:

    // Global access point to get the Singleton instance
    static Singleton* getInstance() {

        // Create the instance only when first requested (initialization)
        if (instance == nullptr) {
            instance = new Singleton();
        }

        // Return the shared instance
        return instance;
    }
};
class Singleton
{
    // Holds the single shared instance (initially not created)
    private static Singleton instance;

    // Private constructor prevents creating objects from outside the class
    private Singleton() { }

    // Global access point to get the Singleton instance
    public static Singleton GetInstance()
    {
        // Create the instance only when first requested (initialization)
        if (instance == null)
        {
            instance = new Singleton();
        }

        // Return the shared instance
        return instance;
    }
}
class Singleton {
  // Holds the single shared instance (initially not created)
  private static instance: Singleton;

  // Private constructor prevents creating objects from outside the class
  private constructor() {}

  // Global access point to get the Singleton instance
  public static getInstance(): Singleton {
    // Create the instance only when first requested (initialization)
    if (Singleton.instance == null) {
      Singleton.instance = new Singleton();
    }

    // Return the shared instance
    return Singleton.instance;
  }
}
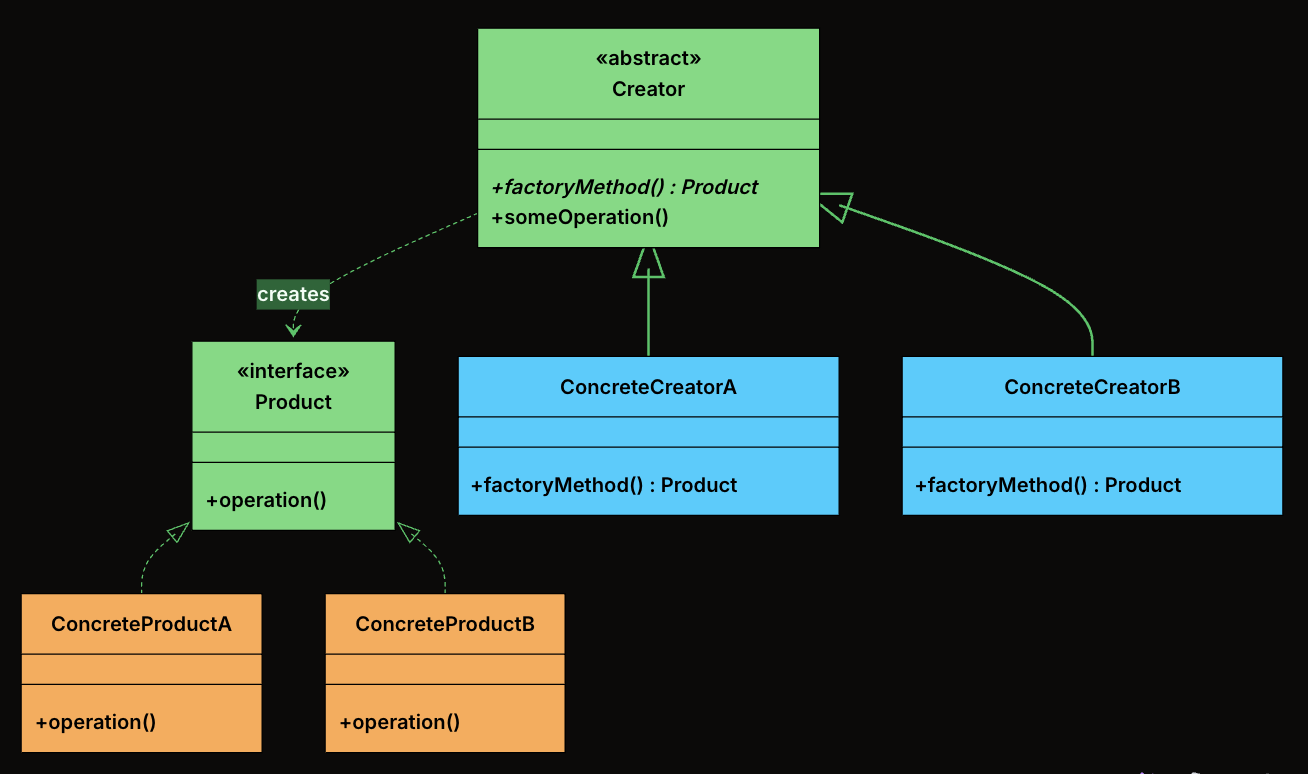
The Factory Method Design Pattern is a creational pattern that provides an interface for creating objects in a superclass, but allows subclasses to alter the type of objects that will be created.
It’s particularly useful in situations where:
The exact type of object to be created isn’t known until runtime.
Object creation logic is complex, repetitive, or needs encapsulation.
You want to follow the Open/Closed Principle, open for extension, closed for modification.
Product: The interface or abstract class that defines the contract for all objects the factory method creates. Every concrete product implements this interface, which means the rest of the system can work with any product without knowing its concrete type.
ConcreteProduct: The actual classes that implement the Product interface. Each one provides its own behavior.
Creator: An abstract class (or an interface) that declares the factory method, which returns an object of type Product.
ConcreteCreator: Subclasses of Creator that override the factory method to return a specific ConcreteProduct. Each creator is paired with exactly one product type.
interface Notification {
    public void send(String message);
}
Define Concrete Products
class EmailNotification implements Notification {
    @Override
    public void send(String message) {
        System.out.println("Sending email: " + message);
    }
}

class SMSNotification implements Notification {
    @Override
    public void send(String message) {
        System.out.println("Sending SMS: " + message);
    }
}

class PushNotification implements Notification {
    @Override
    public void send(String message) {
        System.out.println("Sending push notification: " + message);
    }
}

class SlackNotification implements Notification {
    @Override
    public void send(String message) {
        System.out.println("Sending Slack message: " + message);
    }
}
Define Abstract Creator
abstract class NotificationCreator {
    // Factory Method - subclasses decide what to create
    public abstract Notification createNotification();

    // Shared logic that uses the factory method
    public void send(String message) {
        Notification notification = createNotification();
        notification.send(message);
    }
}
Define Concrete Creators
class EmailNotificationCreator extends NotificationCreator {
    @Override
    public Notification createNotification() {
        return new EmailNotification();
    }
}

class SMSNotificationCreator extends NotificationCreator {
    @Override
    public Notification createNotification() {
        return new SMSNotification();
    }
}

class PushNotificationCreator extends NotificationCreator {
    @Override
    public Notification createNotification() {
        return new PushNotification();
    }
}

class SlackNotificationCreator extends NotificationCreator {
    @Override
    public Notification createNotification() {
        return new SlackNotification();
    }
}
Client Code
public class FactoryMethodDemo {
    public static void main(String[] args) {
        NotificationCreator creator;

        // Send Email
        creator = new EmailNotificationCreator();
        creator.send("Welcome to our platform!");

        // Send SMS
        creator = new SMSNotificationCreator();
        creator.send("Your OTP is 123456");

        // Send Push Notification
        creator = new PushNotificationCreator();
        creator.send("You have a new follower!");

        // Send Slack Message
        creator = new SlackNotificationCreator();
        creator.send("Standup in 10 minutes!");
    }
}
Define the Product Interface
from abc import ABC, abstractmethod

class Notification(ABC):
    @abstractmethod
    def send(self, message: str) -> None:
        pass
class EmailNotification : INotification
{
    public void Send(string message)
    {
        Console.WriteLine("Sending email: " + message);
    }
}

class SmsNotification : INotification
{
    public void Send(string message)
    {
        Console.WriteLine("Sending SMS: " + message);
    }
}

class PushNotification : INotification
{
    public void Send(string message)
    {
        Console.WriteLine("Sending push notification: " + message);
    }
}

class SlackNotification : INotification
{
    public void Send(string message)
    {
        Console.WriteLine("Sending Slack message: " + message);
    }
}
Define Abstract Creator
abstract class NotificationCreator
{
    // Factory Method - subclasses decide what to create
    public abstract INotification CreateNotification();

    // Shared logic that uses the factory method
    public void Send(string message)
    {
        INotification notification = CreateNotification();
        notification.Send(message);
    }
}
Define Concrete Creators
class EmailNotificationCreator : NotificationCreator
{
    public override INotification CreateNotification()
    {
        return new EmailNotification();
    }
}

class SmsNotificationCreator : NotificationCreator
{
    public override INotification CreateNotification()
    {
        return new SmsNotification();
    }
}

class PushNotificationCreator : NotificationCreator
{
    public override INotification CreateNotification()
    {
        return new PushNotification();
    }
}

class SlackNotificationCreator : NotificationCreator
{
    public override INotification CreateNotification()
    {
        return new SlackNotification();
    }
}
Client Code
class Program
{
    static void Main()
    {
        NotificationCreator creator;

        // Send Email
        creator = new EmailNotificationCreator();
        creator.Send("Welcome to our platform!");

        // Send SMS
        creator = new SmsNotificationCreator();
        creator.Send("Your OTP is 123456");

        // Send Push Notification
        creator = new PushNotificationCreator();
        creator.Send("You have a new follower!");

        // Send Slack Message
        creator = new SlackNotificationCreator();
        creator.Send("Standup in 10 minutes!");
    }
}
abstract class NotificationCreator {
  // Factory Method - subclasses decide what to create
  abstract createNotification(): Notification;

  // Shared logic that uses the factory method
  send(message: string): void {
    const notification = this.createNotification();
    notification.send(message);
  }
}
Define Concrete Creators
class EmailNotificationCreator extends NotificationCreator {
  createNotification(): Notification {
    return new EmailNotification();
  }
}

class SMSNotificationCreator extends NotificationCreator {
  createNotification(): Notification {
    return new SMSNotification();
  }
}

class PushNotificationCreator extends NotificationCreator {
  createNotification(): Notification {
    return new PushNotification();
  }
}

class SlackNotificationCreator extends NotificationCreator {
  createNotification(): Notification {
    return new SlackNotification();
  }
}
Client Code
function main(): void {
  let creator: NotificationCreator;

  // Send Email
  creator = new EmailNotificationCreator();
  creator.send("Welcome to our platform!");

  // Send SMS
  creator = new SMSNotificationCreator();
  creator.send("Your OTP is 123456");

  // Send Push Notification
  creator = new PushNotificationCreator();
  creator.send("You have a new follower!");

  // Send Slack Message
  creator = new SlackNotificationCreator();
  creator.send("Standup in 10 minutes!");
}

main();
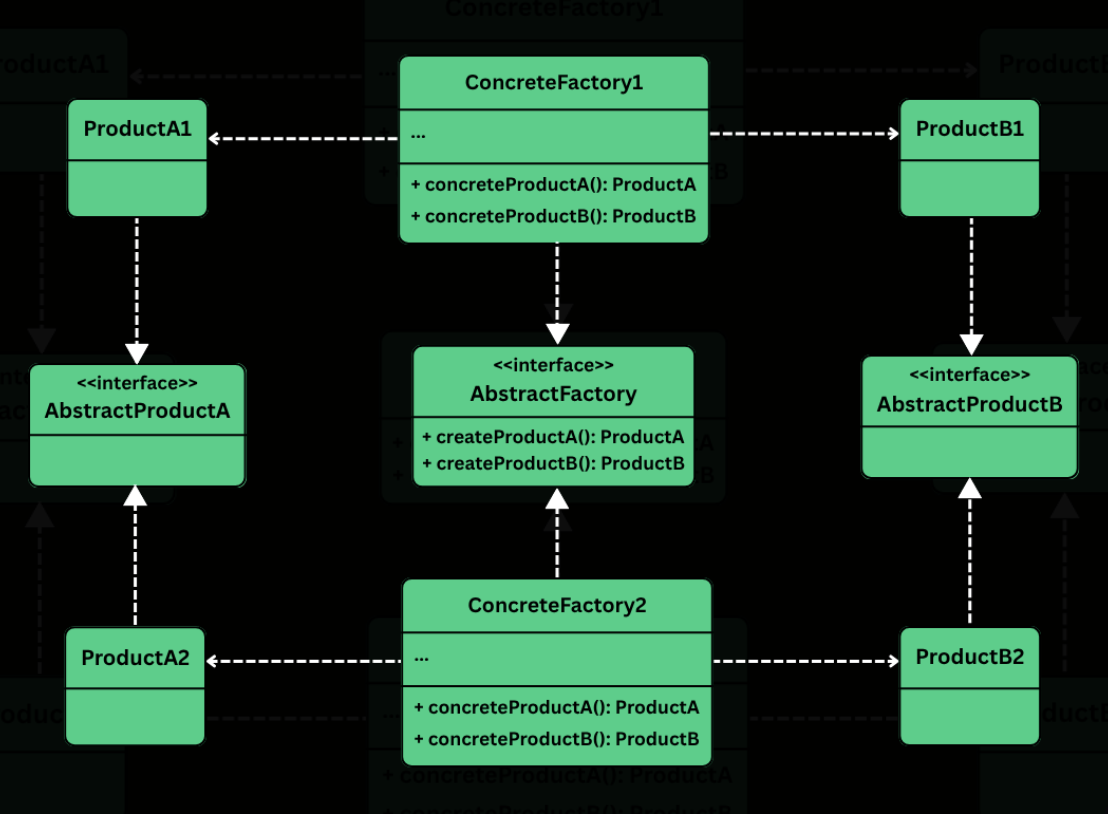
The Abstract Factory Design Pattern is a creational pattern that provides an interface for creating families of related or dependent objects without specifying their concrete classes.
It’s particularly useful in situations where:
You need to create objects that must be used together and are part of a consistent family (e.g., GUI elements like buttons, checkboxes, and menus).
Your system must support multiple configurations, environments, or product variants (e.g., light vs. dark themes, Windows vs. macOS look-and-feel).
You want to enforce consistency across related objects, ensuring that they are all created from the same factory.
class WindowsFactory implements GUIFactory {
    @Override
    public Button createButton() {
        return new WindowsButton();
    }

    @Override
    public Checkbox createCheckbox() {
        return new WindowsCheckbox();
    }
}
MacOSFactory
class MacOSFactory implements GUIFactory {
    @Override
    public Button createButton() {
        return new MacOSButton();
    }

    @Override
    public Checkbox createCheckbox() {
        return new MacOSCheckbox();
    }
}
Client Code
class Application {
    private final Button button;
    private final Checkbox checkbox;

    public Application(GUIFactory factory) {
        this.button = factory.createButton();
        this.checkbox = factory.createCheckbox();
    }

    public void renderUI() {
        button.paint();
        checkbox.paint();
    }
}
Wire Everything Together
public class AppLauncher {
    public static void main(String[] args) {
        // Simulate platform detection
        String os = System.getProperty("os.name");
        GUIFactory factory;

        if (os.contains("Windows")) {
            factory = new WindowsFactory();
        } else {
            factory = new MacOSFactory();
        }

        Application app = new Application(factory);
        app.renderUI();
    }
}
Output (on MacOS)
Painting a macOS-style button.
Painting a macOS-style checkbox.
Output (on Windows)
Painting a Windows-style button.
Painting a Windows-style checkbox.
Define Abstract Product Interfaces
Button
from abc import ABC, abstractmethod

class Button(ABC):
    @abstractmethod
    def paint(self):
        pass

    @abstractmethod
    def on_click(self):
        pass
Checkbox
class Checkbox(ABC):
    @abstractmethod
    def paint(self):
        pass

    @abstractmethod
    def on_select(self):
        pass
Create Concrete Products
Windows Products
class WindowsButton(Button):
    def paint(self):
        print("Painting a Windows-style button.")

    def on_click(self):
        print("Windows button clicked.")


class WindowsCheckbox(Checkbox):
    def paint(self):
        print("Painting a Windows-style checkbox.")

    def on_select(self):
        print("Windows checkbox selected.")
MacOS Products
class MacOSButton(Button):
    def paint(self):
        print("Painting a macOS-style button.")

    def on_click(self):
        print("macOS button clicked.")


class MacOSCheckbox(Checkbox):
    def paint(self):
        print("Painting a macOS-style checkbox.")

    def on_select(self):
        print("macOS checkbox selected.")
Define the Abstract Factory
class GUIFactory(ABC):
    @abstractmethod
    def create_button(self):
        pass

    @abstractmethod
    def create_checkbox(self):
        pass
Implement Concrete Factories
WindowsFactory
class WindowsFactory(GUIFactory):
    def create_button(self):
        return WindowsButton()

    def create_checkbox(self):
        return WindowsCheckbox()
MacOSFactory
class MacOSFactory(GUIFactory):
    def create_button(self):
        return MacOSButton()

    def create_checkbox(self):
        return MacOSCheckbox()
class WindowsFactory : IGUIFactory
{
public IButton CreateButton()
{
return new WindowsButton();
}
public ICheckbox CreateCheckbox()
{
return new WindowsCheckbox();
}
}
MacOSFactory
class MacOSFactory : IGUIFactory
{
public IButton CreateButton()
{
return new MacOSButton();
}
public ICheckbox CreateCheckbox()
{
return new MacOSCheckbox();
}
}
Client Code
class Application
{
private readonly IButton _button;
private readonly ICheckbox _checkbox;
public Application(IGUIFactory factory)
{
_button = factory.CreateButton();
_checkbox = factory.CreateCheckbox();
}
public void RenderUI()
{
_button.Paint();
_checkbox.Paint();
}
}
Wire Everything Together
public class AppLauncher
{
public static void Main()
{
Console.Write("Enter OS (Windows/Mac): ");
string os = Console.ReadLine()?.ToLower() ?? "";
IGUIFactory factory;
if (os.Contains("windows"))
{
factory = new WindowsFactory();
}
else
{
factory = new MacOSFactory();
}
Application app = new Application(factory);
app.RenderUI();
}
}
Output (on MacOS)
Painting a macOS-style button.
Painting a macOS-style checkbox.
Output (on Windows)
Painting a Windows-style button.
Painting a Windows-style checkbox.
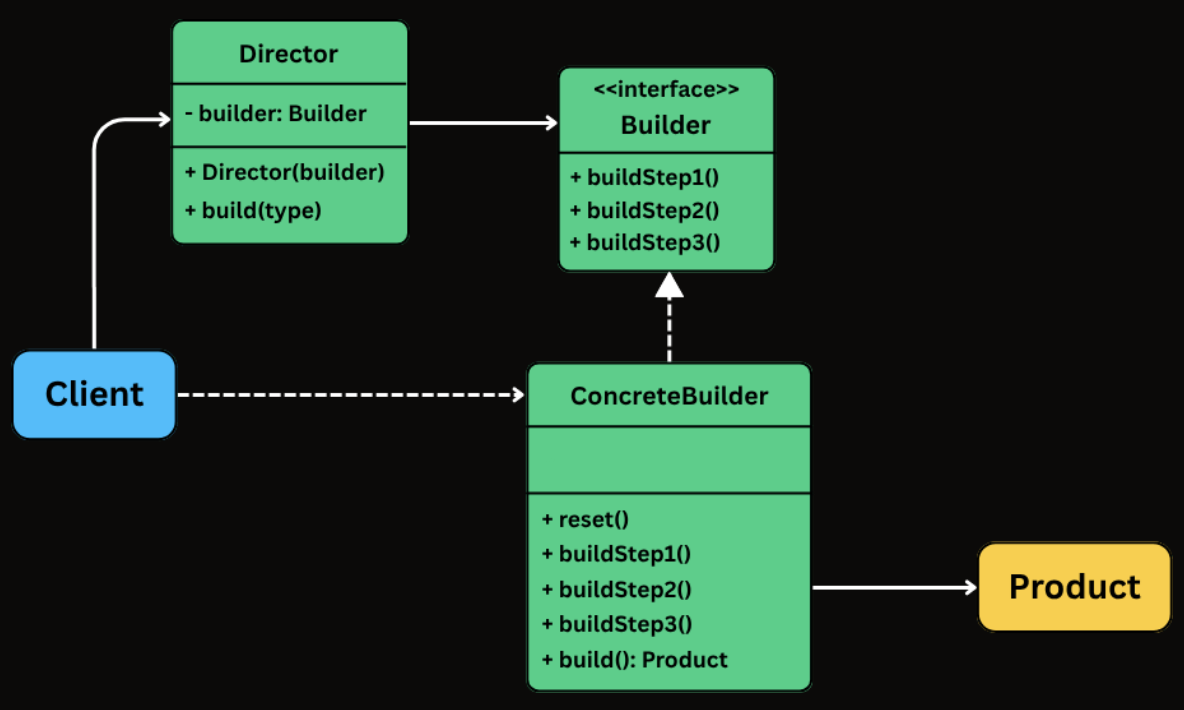
The Builder Design Pattern is a creational pattern that lets you construct complex objects step-by-step, separating the construction logic from the final representation.
Two ideas define the pattern:
Step-by-step construction: Instead of passing everything to a constructor at once, you set each field through individual method calls. You only call the methods for the fields you need.
Fluent interface: Each setter method returns the builder itself, allowing you to chain calls into a single readable expression that ends with build().
The Builder pattern involves four participants. In many real-world implementations, the Director is optional and is often skipped when using fluent builders.
Builder
Exposes methods to configure the product step by step.
Typically returns the builder itself from each method to enable fluent chaining.
Often implemented as a static nested class inside the product class.
ConcreteBuilder
Implements the builder API (either via an interface or directly through fluent methods).
Stores intermediate state for the object being constructed.
Implements build() to validate inputs and produce the final product instance.
Product
The complex object being constructed.
Often immutable and created only through the builder.
Commonly has a private constructor that copies state from the builder.
Director (Optional)
Coordinates the construction process by calling builder steps in a specific sequence.
Useful when you want to encapsulate standard configurations or reusable construction sequences.
Often omitted in fluent builder style, where the client effectively plays this role by chaining builder calls.
class HttpRequest {
    // Required
    private final String url;

    // Optional
    private final String method;
    private final Map<String, String> headers;
    private final Map<String, String> queryParams;
    private final String body;
    private final int timeout;

    // Private constructor - only the Builder can call this
    private HttpRequest(Builder builder) {
        this.url = builder.url;
        this.method = builder.method;
        this.headers = Collections.unmodifiableMap(new HashMap<>(builder.headers));
        this.queryParams = Collections.unmodifiableMap(new HashMap<>(builder.queryParams));
        this.body = builder.body;
        this.timeout = builder.timeout;
    }

    public String getUrl() { return url; }
    public String getMethod() { return method; }
    public Map<String, String> getHeaders() { return headers; }
    public Map<String, String> getQueryParams() { return queryParams; }
    public String getBody() { return body; }
    public int getTimeout() { return timeout; }

    @Override
    public String toString() {
        return "HttpRequest{url='" + url + "', method='" + method +
               "', headers=" + headers + ", queryParams=" + queryParams +
               ", body='" + body + "', timeout=" + timeout + "}";
    }

    // Static nested Builder class
    public static class Builder {
        private final String url; // required
        private String method = "GET";
        private Map<String, String> headers = new HashMap<>();
        private Map<String, String> queryParams = new HashMap<>();
        private String body;
        private int timeout = 30000;

        public Builder(String url) {
            this.url = url;
        }

        public Builder method(String method) {
            this.method = method;
            return this;
        }

        public Builder addHeader(String key, String value) {
            this.headers.put(key, value);
            return this;
        }

        public Builder addQueryParam(String key, String value) {
            this.queryParams.put(key, value);
            return this;
        }

        public Builder body(String body) {
            this.body = body;
            return this;
        }

        public Builder timeout(int timeout) {
            this.timeout = timeout;
            return this;
        }

        public HttpRequest build() {
            return new HttpRequest(this);
        }
    }
}
Using the Builder from Client Code
public class Main {
    public static void main(String[] args) {
        // Simple GET request - just the URL
        HttpRequest get = new HttpRequest.Builder("https://api.example.com/users")
                .build();

        // POST with body and custom timeout
        HttpRequest post = new HttpRequest.Builder("https://api.example.com/users")
                .method("POST")
                .addHeader("Content-Type", "application/json")
                .body("{\"name\":\"Alice\",\"email\":\"alice@example.com\"}")
                .timeout(5000)
                .build();

        // Authenticated PUT with query parameters
        HttpRequest put = new HttpRequest.Builder("https://api.example.com/config")
                .method("PUT")
                .addHeader("Authorization", "Bearer token123")
                .addHeader("Content-Type", "application/json")
                .addQueryParam("env", "production")
                .addQueryParam("version", "2")
                .body("{\"feature_flag\":true}")
                .timeout(10000)
                .build();
    }
}
int main() {
    // Simple GET request
    HttpRequest get = HttpRequest::Builder("https://api.example.com/users")
        .build();

    // POST with body and custom timeout
    HttpRequest post = HttpRequest::Builder("https://api.example.com/users")
        .setMethod("POST")
        .addHeader("Content-Type", "application/json")
        .setBody("{\"name\":\"Alice\",\"email\":\"alice@example.com\"}")
        .setTimeout(5000)
        .build();

    // Authenticated PUT with query parameters
    HttpRequest put = HttpRequest::Builder("https://api.example.com/config")
        .setMethod("PUT")
        .addHeader("Authorization", "Bearer token123")
        .addHeader("Content-Type", "application/json")
        .addQueryParam("env", "production")
        .addQueryParam("version", "2")
        .setBody("{\"feature_flag\":true}")
        .setTimeout(10000)
        .build();

    return 0;
}
Create the Product and Builder
class HttpRequest
{
    public string Url { get; }
    public string Method { get; }
    public IReadOnlyDictionary<string, string> Headers { get; }
    public IReadOnlyDictionary<string, string> QueryParams { get; }
    public string Body { get; }
    public int Timeout { get; }

    // Private constructor
    private HttpRequest(Builder builder)
    {
        Url = builder.Url;
        Method = builder.Method;
        Headers = new Dictionary<string, string>(builder.Headers);
        QueryParams = new Dictionary<string, string>(builder.QueryParams);
        Body = builder.Body;
        Timeout = builder.Timeout;
    }

    public override string ToString()
    {
        return $"HttpRequest{{Url='{Url}', Method='{Method}', " +
               $"Headers={Headers.Count}, QueryParams={QueryParams.Count}, " +
               $"Body='{Body}', Timeout={Timeout}}}";
    }

    public class Builder
    {
        public string Url { get; }
        public string Method { get; private set; } = "GET";
        public Dictionary<string, string> Headers { get; } = new();
        public Dictionary<string, string> QueryParams { get; } = new();
        public string Body { get; private set; }
        public int Timeout { get; private set; } = 30000;

        public Builder(string url) {
            Url = url;
        }

        public Builder SetMethod(string method)
        {
            Method = method;
            return this;
        }

        public Builder AddHeader(string key, string value)
        {
            Headers[key] = value;
            return this;
        }

        public Builder AddQueryParam(string key, string value)
        {
            QueryParams[key] = value;
            return this;
        }

        public Builder SetBody(string body)
        {
            Body = body;
            return this;
        }

        public Builder SetTimeout(int timeout)
        {
            Timeout = timeout;
            return this;
        }

        public HttpRequest Build()
        {
            return new HttpRequest(this);
        }
    }
}
Using the Builder from Client Code
class Program
{
    static void Main()
    {
        // Simple GET request
        var get = new HttpRequest.Builder("https://api.example.com/users")
            .Build();

        // POST with body and custom timeout
        var post = new HttpRequest.Builder("https://api.example.com/users")
            .SetMethod("POST")
            .AddHeader("Content-Type", "application/json")
            .SetBody("{\"name\":\"Alice\",\"email\":\"alice@example.com\"}")
            .SetTimeout(5000)
            .Build();

        // Authenticated PUT with query parameters
        var put = new HttpRequest.Builder("https://api.example.com/config")
            .SetMethod("PUT")
            .AddHeader("Authorization", "Bearer token123")
            .AddHeader("Content-Type", "application/json")
            .AddQueryParam("env", "production")
            .AddQueryParam("version", "2")
            .SetBody("{\"feature_flag\":true}")
            .SetTimeout(10000)
            .Build();
    }
}
// Simple GET request
const get = new HttpRequest.Builder("https://api.example.com/users").build();

// POST with body and custom timeout
const post = new HttpRequest.Builder("https://api.example.com/users")
  .setMethod("POST")
  .addHeader("Content-Type", "application/json")
  .setBody('{"name":"Alice","email":"alice@example.com"}')
  .setTimeout(5000)
  .build();

// Authenticated PUT with query parameters
const put = new HttpRequest.Builder("https://api.example.com/config")
  .setMethod("PUT")
  .addHeader("Authorization", "Bearer token123")
  .addHeader("Content-Type", "application/json")
  .addQueryParam("env", "production")
  .addQueryParam("version", "2")
  .setBody('{"feature_flag":true}')
  .setTimeout(10000)
  .build();